| Install Eclipse and Sage Plug-in |
Updated: July 2019 |
| Pre-requisites |
- Java
-
 |
The Oracle Java License has changed for releases starting April
16, 2019.
The new license permits certain uses, such as personal
use and development use, at no cost -- but other uses authorized under prior
Oracle Java licenses may no longer be available. Please review the terms
carefully before downloading and using this product. An FAQ is available at
https://www.oracle.com/technetwork/java/javase/overview/oracle-jdk-faqs.html. |
The Sage Plug-in for Eclipse requires the latest Java run-time environment.
Oracle Java
Install the latest racle Java SE run-time from the
Oracle web site http://www.java.com.
Oracle JDK
Install the latest Oracle Java JDK run-time from the
Oracle web site https://www.oracle.com/java/technologies/downloads/.
OpenJDK
- Go to the OpenJDK web site
(https://jdk.java.net/)
- Go to the page for the latest release version of the JDK, and download the
version for your operating system. In March 2022, the latest version is
JDK 18.
- Unpack the file into C:\Program Files\Java, create the folder, if
necessary
- Search for 'Edit System Environment variables' in the Control
Panel
- Click 'Environment Variables...' and edit the System Path
environment variable.
- Add the path to the location of the OpenJDK 'bin' folder (for OpenJDK 18
the path is: C:\Program Files\Java\jdk-18\bin) and place at the top
(beginning) of the list and save the changes.
Check Java Version
Open a command window and check the version of
Java with the command 'java -version'; older versions will use 'java
--version'.
- ProvideX with Developer License
-
Install ProvideX on the local system with a developer license for at least two
users.
|
| Install Eclipse |
- Select/Download Eclipse Distribution
-
Download an Eclipse distribution from the Eclipse web site ( http://www.eclipse.org ). For Windows, download
the installer executable or click the Download Packages link to select an
alternate install package.
There are a large number of distributions available for download that have
been created for specific development environments. It is best to review this list
and choose the one that is closest to your requirements. If the selected
distribution does not include all of the prerequisites for the plug-in, these can
be installed using the Software Installation mechanism in Eclipse.
If you are planning to only develop using the Sage Plug-in for Eclipse,
the distribution for Java developers is the smallest one that includes all of the
required prerequisites.
- Unpack/Install Eclipse
-
If you are using a distribution ZIP file from the Eclipse web site, simply
unpack it on your system.
 |
For a consistent install on multiple workstations with different
operating system versions, create a new folder in the root directory of the
primary drive (for example: apps) and unpack the file into this folder.
|
There is no setup program - once the file has been unpacked, the Eclipse
install is complete.
Now is a good time to create a shortcut to the Eclipse executable file to
make it easier to locate and use later.
|
| Install Sage Plug-in for Eclipse |
- Software Update
-
The simplest method for installing additional plug-ins is to use the "Software
Update" capability in Eclipse. From the Eclipse menu, choose Help > Install
New Software...
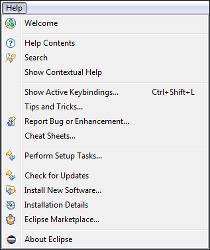
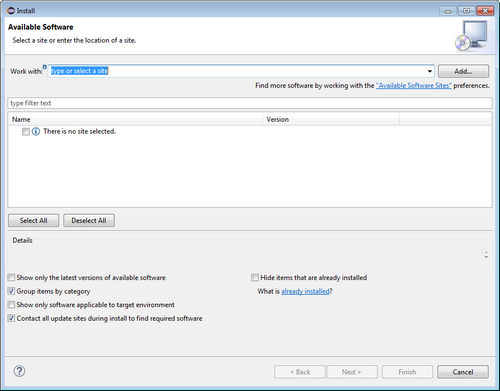
The "Available Software" screen will display...
- Define Update Site
-
Review the list of existing update sites to locate the site to use. If the
site cannot be found in the list, the location of update site must be added to the
list.
Click Add to create a new update site.
Enter a name and URL for the Sage Plug-in update site:
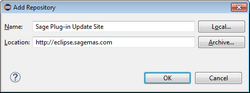
Click OK to complete the creation of the repository definition.
|
If a ZIP file from the Plug-in Update site, it can be used as the
installation source by clicking Archive... and selecting the ZIP file.
|
- Install Plug-in
-
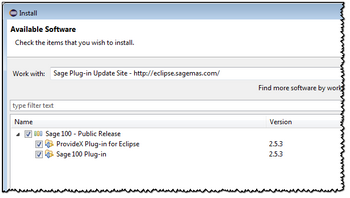
The following example demonstrates how to install the latest version of the Sage
100 ERP plug-in. These steps and messages will be similar for any other plug-in.
- Expand the Sage 100 - Public Release category
- Select the ProvideX Plug-in for Eclipse and Sage 100
Plug-in
- Click Next to continue the installation process
A new dialogue will display with a list of the items that were selected for
installation. Click Next to begin the next step of the install process.
The next dialogue will display the licenses for the selected plug-in(s) for
you to review. Once the licenses have been reviewed, select radio button below the
license text to indicate whether you accept the terms of the license agreement.
- If you do not accept the terms of the license agreement, you cannot
continue and must click Cancel to abort the installation process.
- If you accept the terms of the license agreement, click Finish to
continue the installation process.
The files for each of the selected plug-ins will download and install. A
progress window will show the progress of the installation process.
|
If the installation package for any of the selected plug-ins is not
signed, a security message will be displayed asking you to verify that the
software should be installed. You must click OK to continue with the
installation.
|
Once the installation is completed, the software update process will ask to restart
Eclipse for the modifications to take effect. Click Restart Now to restart
Eclipse.
- Eclipse Welcome Page
-
Eclipse will restart and display the "Welcome" page which is used to access
additional information about some of the registered features of the Eclipse
installation.
The selected plug-ins are now installed; close the welcome page by pressing
the button on the toolbar to go to the workbench or by pressing the close button on
the "Welcome" page tab.
|